Checkatrade Pay & Zapier Integration
The integration of Checkatrade and Zapier is designed to streamline the process of updating your systems with events from your Checkatrade account when you send a Checkatrade Pay request.
Initially, the integration will allow you to send key payment events throughout the payment lifecycle to your CRM and/or accounting platform. The next version will allow you to create invoices in your accounting software, for example, and automatically send a Checkatrade Pay payment link.
Overview
This guide outlines the steps required to integrate Checkatrade Pay with your business systems via Zapier Webhooks. By following these instructions, you can automatically trigger workflows in your accounting, CRM, or internal systems based on key payment events — such as Payment Requested, Payment Paid, and Payment Cancelled.
Prerequisites
Before starting, ensure you have:
An active Zapier account (free or paid plan).
Registered to Checkatrade Pay
Administrative permissions on any third-party tools you plan to integrate (e.g. Xero, QuickBooks, Salesforce, HubSpot, etc.)
Step 1 — Create or Access Your Zapier Account
Go to Zapier and sign in or create a new account.
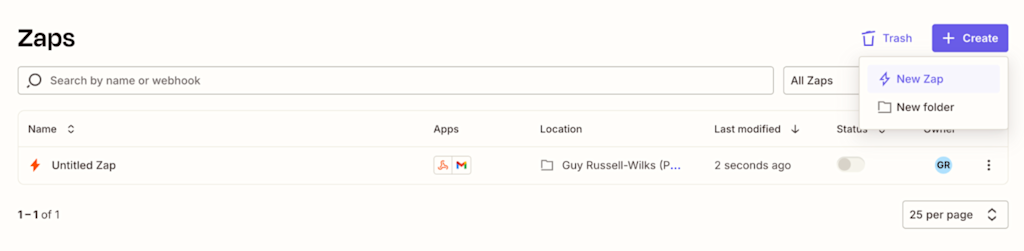
Once logged in, click “Create Zap” from your Zapier dashboard.
Step 2 — Configure Your Trigger (Inbound Webhook)
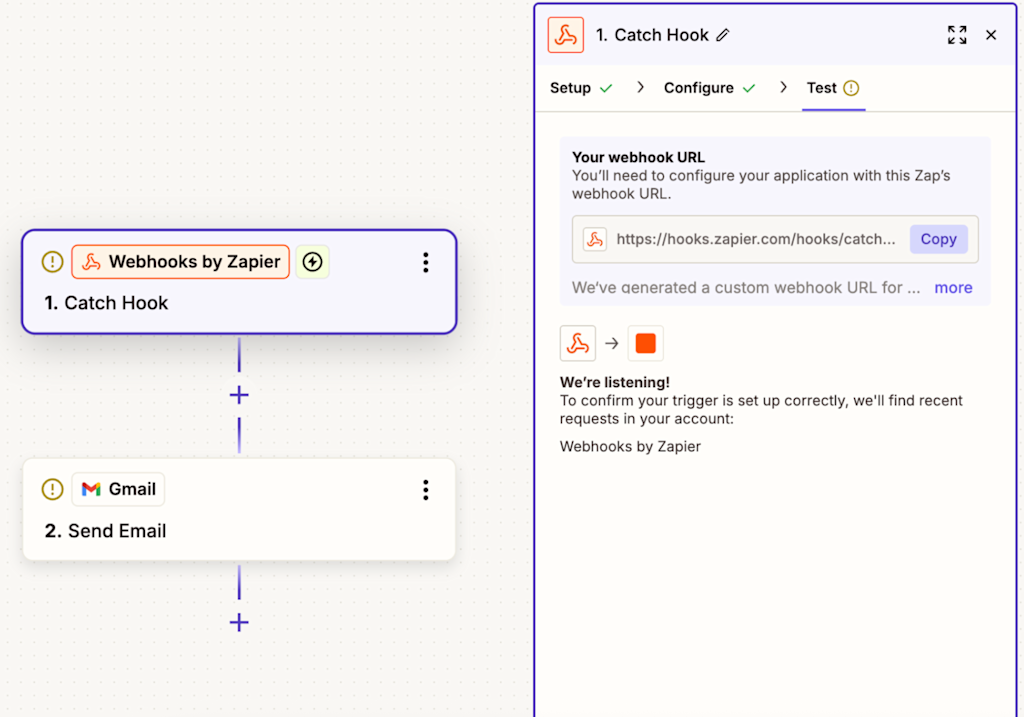
In the Trigger step, search for “Webhooks by Zapier.”
Select the Trigger Event: Catch Hook and click Continue.
Leave the Child Key field blank unless instructed otherwise by Checkatrade.
Click Continue — Zapier will generate a unique Webhook URL.
This URL is where Checkatrade Pay will send payment event data.
Step 3 — Register the Webhook(s) with Checkatrade Pay
Copy the generated Webhook URL(s).
Submit them via the official Checkatrade Webhook Registration Form
We recommend registering three separate webhooks, one for each event type:
Payment Requested
Payment Paid
Payment Cancelled
Best Practice: Using distinct hooks for each event type allows for cleaner automation logic, simplified troubleshooting, and more granular tracking in downstream systems.
Step 4 — Checkatrade Configuration & Testing
Once you submit your webhook URLs:
The Checkatrade Integrations Team will associate your webhooks with your account.
Our team will reach out to schedule a brief testing window (contact us at payments@checkatrade.com)
During testing, we’ll send sample payloads for each event type to confirm:
Data structure alignment (field names and values).
Receipt and response status (HTTP 200 expected).
Successful trigger initiation within Zapier.
Once confirmed, you’ll be ready to move into production.
Step 5 — Define Your Zapier Action (Outbound Workflow)
Find out more about the payload information that you will receive here in our developer docs
Now that the trigger is active, decide where the payment data should flow next.
Add a new Action step in your Zap.
Select the destination app (e.g. Xero, QuickBooks, Salesforce, HubSpot, Google Sheets, etc.).
Choose the appropriate Action Event — for example:
Create/Update Sales Invoice (in Xero)
Update Customer Record (in Salesforce or HubSpot)
Log Payment Record (in a Google Sheet or internal database)
When mapping fields, you’ll have access to all payload data provided by Checkatrade, such as:
amount
fees
customer_name
payment_status
description
Step 6 — Map Data Fields
Use Zapier’s data mapping interface to match Checkatrade Pay fields with your system’s corresponding fields. For example:
Checkatrade Pay Field | Destination System Field (Example: Xero) |
amount | Invoice Amount |
customer_name | Contact Name |
payment_reference | Invoice Reference |
description | Memo or Payment Description |
One way you can ensure seamless reconciliation is using the Description field when creating a Checkatrade Pay requests to embed your customer or invoice number. This will make downstream matching in your accounting system automatic and reliable.
Step 7 — Validation and Go-Live
Run end-to-end tests for each event type (requested, paid, cancelled) to confirm:
Data flows correctly into your target system.
Field mappings resolve as expected.
No validation or authentication errors occur.
Once validated, turn on your Zaps.
For further discussions, please contact payments@checkatrade.com
Triggers
Checkatrade Event | Zapier Action Examples | Description |
New Payment Request | Update a contact in a CRM (e.g. Salesforce) | When a new request for payment is raised. |
Paid Payment Request | Update an accounting invoice (eg. Xero) | When a request for payment is paid. |
Cancelled Payment Request | Send a notification to a comms tool (eg. Gmail) | Keep project statuses synchronized across platforms |