Blog>How-To Guides>How to lay garden sleepers
Last updated: 26 November 2021

How to lay garden sleepers
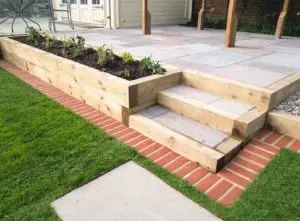
Garden sleepers have become one of the most popular ways to define spaces within a garden, including steps, flower bed edging, raised planters and even benches. In this guide we look at how to lay garden sleepers to make the most of your outdoor space.

Garden sleepers have become one of the most popular ways to define spaces within a garden, including steps, flower bed edging, raised planters and even benches. In this guide, we look at how to lay garden sleepers to make the most of your outdoor space.
5 steps for how to lay garden sleepers
In order to achieve finished results that stand the test of time, here are our top tips for how to lay sleepers in your garden:
Step 1 – Create a clear space for your sleepers
Whether you’re creating a raised planter for your flowers, a set of sleeper steps or edging for your lawn, you need to make sure the area is clear of any vegetation and debris. You want a clear canvas where you’re going to layer your sleepers.
Step 2 – Fix the garden sleepers into position
The best way to fix your garden sleepers will vary depending on what you’re using them for. For edging and planters, you’ll want to dig down a shallow trench to lay the sleepers in. If you’re creating a low border you might be able to keep the sleepers in place by fixing a wooden post or spike behind them.
Step 3 – Stack your sleepers (if you're going for height)
If you're creating a structure that is going to be more than one sleeper high, make sure you overlap the sleepers neatly at the corners. Then whip out your spirit level to ensure they’re sitting evenly.
Step 4 – Join your sleepers together
There are a number of ways that you can connect your garden sleepers together to create a solid and stable structure. One of the most popular options is to use steel rod pins or long landscaping screws. Alternatively, you can use metal plates and corner braces to build a strong, square finish for your garden sleepers.
Step 5 – Finish off the surface of the sleepers
Nobody wants to run the risk of getting a splinter from your garden sleepers, so make sure you sand off any sharp splinters of wood. Also, if you want to paint or stain the sleepers, now is the time to apply your varnish or wood paint to create the desired effect.
Top tip: If you’re creating a set of steps with your sleepers then you might want to consider covering them with wire mesh or a material with grip so that you avoid slippery steps when they’re wet.
If you're at all stuck with any of the stages, then we would recommend contacting your local landscaper for a helping hand.
See the tradespeople we've checked for your job
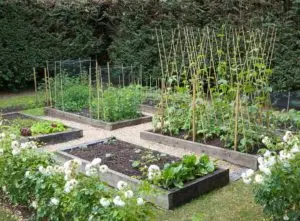
How to lay sleepers for garden edging
If you’re wondering how to lay railway sleepers in the garden to create a defined edging for a lawn, path or plant bed, here’s what to do:
Choose where the edging will be. Before you start laying any sleepers you need to identify exactly where you’ll be laying the sleepers. You’ll then need to measure the sections of edging so that you can plan and cut the sleepers if needed.
Prepare the foundation. This involves digging a shallow trench and then adding in the foundations. You can either opt for concrete, sand or gravel foundations or lay the sleepers on the soil with no official foundation. For the latter option, make sure you put down a waterproof sheet under the sleepers to avoid them soaking up moisture from the soil.
Lay garden sleepers border. Typically either one or two layers of sleepers is enough to create a defined garden edging. For raised gardens, you may need more sleepers, depending on how high you need it to go.
Add the soil. Once you’ve got your garden sleeper edging to the right height, add in your soil and compost as the base of your garden – you’re now ready for planting.
Tools for laying garden sleepers
If you’re planning to lay railway sleepers in your garden, here are the basic tools and materials you’ll most likely need:
Railway sleepers (either new or reclaimed)
Heavy-duty gardening gloves
Saw
Spirit level
Steel rods, sleeper screws or metal plates and brackets
Screwdriver
Retaining posts
Varnish (optional)
See the tradespeople we've checked for your job
FAQs
Can you lay railway sleepers on soil?
Yes you can. If you’re only creating a structure that’s one or two sleepers in height you don’t necessarily need foundations, which means you can lay your railway sleepers onto the soil. Though you’ll want to make sure you use some kind of waterproof membrane so that sleepers don’t soak up water from the soil.
It’s also worth noting that water pooling can occur around the sides of the sleepers, which can lead to the sleeper wood rotting much faster. If you don’t want the hassle of laying concrete foundations for your garden sleepers, sand or gravel can also be used and both materials will allow water to drain away.
How do you fix railway sleepers to the ground?
There are a number of ways to fix railway sleepers to the ground. If you have a concrete base you can use metal rods that you drill into the foundation and into the sleepers. Alternatively, you may not need to fix the sleepers to the ground if you’re creating a structure with railway sleepers – often the weight of the sleepers themselves is enough to keep them firmly in place.
How long do garden sleepers last?
The lifespan of garden sleepers depends on what type of timber the sleepers are made from, any treatment they’ve had and how much exposure they’ve had to the elements. Hardwood garden sleepers can be known to last up to 100 years, whereas an untreated softwood sleeper may last less than 5 years.
The most popular garden sleepers these days tend to be treated softwood and you can expect them to last somewhere in the region of 15 - 30 years if you look after them well.
What are the best sleepers for gardens?
When it comes to choosing the type of sleepers you lay in your garden, you have a number of options. Here’s a quick summary of some of the most common sleepers:
New European Oak sleepers – Generally pretty good value and provide a very neat look for a modern garden.
Treated softwood sleepers – Thanks to them being treated, these softwood sleepers are designed to last much longer than an untreated version.
Reclaimed sleepers – If you’re looking for a rustic look for your garden, reclaimed railway sleepers are the best choice thanks to their worn-in appearance. Though they’ve often been treated with chemicals that make them an unsuitable choice for children’s play areas or anywhere that they might come into contact with skin.


See the tradespeople we've checked for your job