EXPERT ADVICE
A complete guide to the snagging list process
Updated 06/26
By: Laura Macdonald
Reviewed: Alex Peters
A snagging list is something that's carried out on new build properties to identify any issues that must be addressed before completion. But who completes the snagging survey and what should it include? Read on to find out how to snag.
At the end of a renovation project or house build, it's quite normal to create a snagging list. But if you're new to this, you may not know what this means exactly or how to go about creating one.
In this post, we'll guide you through what a snagging list is, how to snag a project with ease, and some top tips to ensure every last detail is covered.
What a snagging list is
When you need one
What should be included
Who can carry out a snag list
Checklist of things to look for
Frequently asked questions

What is a snagging list?
A snagging list is a term used in the construction industry. It refers to the process of inspecting completed building work to identify any minor defects or omissions that need to be fixed before handover to the contractor, developer, or homeowner.
This can include:
Things that are damaged or broken
Items that are not properly fitted or installed
Unfinished work
While it's not a legal requirement, a construction snag list is a crucial part of a new build project. Problems that are overlooked at this stage can turn out to be expensive to correct further down the line.
If you're buying a new build property, your house builder should check and fix any snags before you finish the process of buying your house.
However, they probably won't pick up on everything before you move in. In this case, you can usually put together your own snagging list - or hire a snagging inspector or building surveyor to undertake a snagging report for you - in order to report any defects to your house builder.
New-build properties tend to have fewer issues and defects than older properties. But that doesn't mean they're fuss-free. New builds can be notorious for snagging problems.
Common snagging list examples
A snag list can include all manner of defects and omissions ranging from small, cosmetic issues to significant structural problems and building regulations concerns.
Minor and major snags could include:
Scratches to paintwork
Missing fixings
Damp
Leaks
Damaged items
Poorly fitted appliances
Some of the most common snagging list examples include leaking pipes, poor quality paintwork and/or plastering, and unfinished electrical sockets or light switches.
Find a trusted tradesperson in your area

What should be included on a snagging list?
The process of snagging includes both the interior and exterior of a property.
It includes checking everything from the roof, walls, driveway, and front gate, to the windows, kitchen units, bathroom fixings, paintwork, plumbing (and more!).
The key areas of the property to be checked as part of the snagging process are:
Roof
Check for any loose, cracked, or missing tiles
Check the flashings are secure
Drainage
Check the gutters and downpipes are secure and leak-free
Check the drains are free of debris
Exterior checks
Check the exterior cosmetics, e.g. brickwork
Check fences and gates
Check the driveway and garage
Walls and ceilings
Check walls are straight and the plaster smooth - from top to bottom
Check for any unfinished areas
Check the paintwork has been completed to a high standard - no patchy spots, incomplete areas, or drips
Windows
Frames: Are they free of damage and are they properly sealed?
Glass: Are there any scratches or paint on the glazing?
Functionality: Do they open, close, and lock as expected?
Doors
Functionality: Do all doors open and close correctly - take note of the handles and hinges
Security: Do the locks work?
Aesthetics: Is the spacing between the door and the doorframe even all the way around?
Floors
Floors should be level and should not creak
Check tiles to ensure they're not broken or cracked
Check carpet or wood flooring has been fixed securely
Check all edges have been properly sealed and skirting attached
Heating and plumbing
Turn on the heating system to check it all works properly, including any wet underfloor heating
Check all zones have been correctly connected to the thermostats
Check the hot taps deliver hot water
Fill the sink, check the overflow works, and watch for any leaking pipes around the basin
Check the toilets flush
Check the loft and the insulation
Lighting and electrics
Check all the light switches and electrical sockets work and are neatly fitted
Check the fuse board is correctly fitted and labelled
Check smoke alarms have been fitted and that they work
Kitchen and bathrooms
Check all cupboards and drawers align and open and close as they should
Check tiles have been neatly grouted and the areas around sinks, baths, and showers have been sealed
Make sure the extractor fans work
Pipework
Check soil pipes and vent pipes are fitted securely, properly connected, and free of leaks
Check entry and exit points around pipework to ensure walls have been made good and any units have been neatly cut
Stairs
Check the treads are level and that they don't creak
Check the handrail is secure

Snagging list checklist
Consider getting a snagging survey to ensure you're happy with your new build purchase.

Snagging list checklist: Things to look for

How to snag a new build house
If you're buying a new build property - rather than completing a self build - then your builder should have attempted to resolve snags already before you complete on your purchase.
However, they'll often miss some defects.
You'll usually be able to report defects to your home builders by creating your own snagging list once you've moved in, or you can get a snagging survey completed if you prefer.
In this section, we'll cover some of the common questions around a snagging list and some snagging tips to help make the process as straightforward as possible.
Who prepares the snagging list?
It is possible to create a snagging list yourself, accompanied by your project manager, main contractor (or individual trades), and possibly even your architect.
Depending on the size and scope of the project, the process of snagging can take a full day, walking around the house and noting any defects.
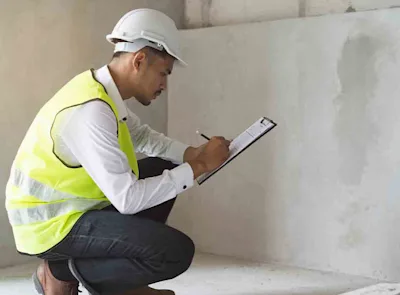
Another option is to pay for a surveyor to conduct a new build snagging survey, typically costing between £300-600 depending on the size and value of the property. A surveyor's experience and knowledge will ensure an efficient but thorough job, delivered in a concise report.
How should a snagging list be created?
For a snagging list to be well-executed, it must offer complete clarity to all stakeholders.
For this reason, using a spreadsheet that can be updated by key stakeholders is helpful. This will include:
An item number for each snag
The location of the item
The category that snag falls under, e.g. 'electrics'
The date the snag was noted
The remedial work that's needed (to fix the snag) and by what date (give a deadline)
The person responsible for fixing the snag
The status of the snag: either 'outstanding' or 'complete'
Photographs can often prove helpful during the snagging process to help identify the location of the item, explain the problem, and detail the remedy.
Find a tradesperson near you

FAQs
What is the process of snagging?
The process of snagging involves a walkthrough of a property to identify any outstanding issues that need to be fixed before final handover. This can include all manner of tasks from patchy paintwork to leaky pipes, poorly fitted units to a broken lock.
Should snagging be done before or after completion?
In a new build home, it's recommended to do a snagging survey before you exchange contracts and move in.
However, not all developers will allow snagging before completion. In this instance, prioritise your snagging list as soon as you move in as your warranty period will cover the correction of any defects.
Do builders have to fix snags?
In most cases, your builder or subcontractors are responsible for addressing any snags without delay.
It's quite typical for the snagging list to be drafted by the main contractor, who will then examine the scope of the work to be done before issuing tasks and responsibilities to individual subcontractors.
It's common practice in the construction trade to withhold 2.5-5% of the agreed contractor price to cover any snagging work. However, this must be written into your contract from the start.
How long does a builder have to fix snags?
The main contractor will specify a project completion date once the snagging list has been drawn up and tasks communicated to the subcontractors alongside agreed timescales.
The snag list should be completed before the final construction walkthrough.
In a new build home, the contractor has a responsibility to rectify any defects within the first 12 months of the building completion (not from the date when you moved in).


See the tradespeople we've checked for your job