Blog>How-To Guides>How to replace a light switch
Last updated: 10 December 2021

How to replace a light switch
Learning how to replace a light switch might seem simple. However, these practical items come in various shapes, sizes, and materials with different functionalities.

Learning how to replace a light switch might seem simple. However, these practical items come in various shapes, sizes, and materials with different functionalities. If you're hoping to replace one yourself, you might be looking to upgrade from a plain design to a more stylish model. Alternatively, you might be hoping to swap an existing switch to a dimmer or double control panel that lets you manage your lighting more easily.
Although changing a light switch is relatively simple, working with electronics comes with various risks. That's why it's always worth hiring a professional. If you're looking to do it yourself, read on for our top tips and expert advice.
Check out our cost to replace a light switch guide for information on pricing up your project.
How to replace a light switch
Types of light switch
There are several types of light fittings or 'plate switches' that have one to three (or more) switches (aka gangs) on a panel. There are also two or multi-way switches that allow you to control more than one light. And when it comes to fittings, there are various plastic, metal, or stylized options on the market. The same goes for dimmer options, which are wired in a similar way to standard switches. For most ceiling-mounted pull-cord switches, building regulations stipulate that they're installed in shower rooms, wetrooms, or bathrooms.
Tools you'll need for the job
Screwdriver to unscrew the light switch plates
Grounding strap
Circuit tester
Electrical tape
Wire cutters/strippers
Wire nut
How to replace a double light switch
Follow these steps if you've asked yourself, 'how do I remove a light switch and replace it?'
Step one: Turn off the power
Electricity is dangerous and requires turning off in case you accidentally hurt yourself. This goes for wiring small items like a double light switch, so make sure you locate the electrical panel that feeds your entire home and turn off the power. This should be easy if you have breakers that are labelled correctly. However, if you're unsure, turn the main power off just to be on the safe side.
Step two: Double-check the current isn't live
Take off the faceplate on the light switch you want to replace using your screwdriver. Then, put on your grounding strap and put the other end on the metal in the box. Keep it there while you use your circuit tester to make sure there's no electricity by pressing the contacts to each wire, including the space between wires. Once you've established there's no current, continue to step three. If there is still a charge, go back to step one.
Step three: Identify each wire
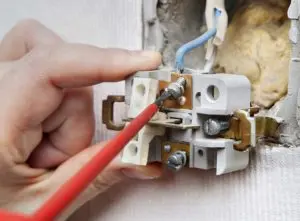
Most light switches have three wires: hot (red or black) neutral (white), and grounding (bare, green, yellow or green and yellow stripes). For double switches, there will be multiple wires that go to each light fixture and one to the breaker box. Put some electrical tape around each individual hot wire (this is so you can identify them later) then group the rest of the wires coming from the wall box by their colours. Use some electrical tape to secure them (neutrals together and grounding together, etc.)
Step four: Strip the wires
Once you've isolated your groups, take your wire cutters and strip the insulation from each end of every grouped wire. Twist the bare ends and 'cap' them together with an electrical wire nut.
Step five: Connect the double light switch
Once your wires are capped, loosen (but don't pull out!) the screws on the double light switch. This will reveal the old wire connections on the double light switch that you want to mimic with the new connections. To do this, wrap the ends of the hot wires (the ungrouped ones you wrapped in electrical tape) around the screws. You'll also need to attach:
the breaker box hot wire to the black terminal screw; and
the hot wires leading to the light fixtures to the other two terminal screws.
Once you've wrapped the hot wires around their relevant terminal screws, tighten them up and secure the new switches to the switch box. Now all you need to do is replace your faceplate, turn the power back on, and test out your handiwork!
How to replace a light switch with a dimmer
If you're looking to replace your standard switch with a dimmer switch, these five simple steps will help:
Locate the circuit or fuse panel and make sure the power is turned off.
Remove the switch plate by unscrewing it and make sure the circuit is dead by testing it with your voltage tester.
Pull out the switch with the wires still attached by unscrewing it from the electrical box, then remove the wires from the old switch.
Dimmer switches tend to be connected to the house wiring instead of screw terminals. This means short lengths of wire come out of the switch body instead, making them an easier swap.
Most new fixtures come with wire nuts, so use them to attach the black wires coming out of the dimmer switch to the coloured wires attached to the terminals on the old switch.
How to replace a 3 way light switch
Three-way switches are handy when it comes to controlling light from two locations. For example, at the top and bottom of a staircase. Strangely, three-way light switches only apply to two switches that control one light. The 'three' refers to the three terminal screws these switches have.
Follow these steps to learn how to replace a 3-way light switch:

Locate the circuit or fuse panel and make sure the power is turned off.
Remove the switch plate by unscrewing it, then make sure the circuit is dead by testing it with your voltage tester.
Pull out the switch with the wires still attached by unscrewing it from the electrical box, then remove the wires from the old switch.
It's worth noting that three-way switches have a minimum of three wires – four if there's a ground wire. There will be two wires that attach to screw terminals (generally located at the top of the switch) and an additional wire attached to a dark-coloured (that isn't green) screw terminal usually located at the bottom of the switch. This is the one you want to mark with a piece of electrical tape. Note: Make sure you mark it on the same side as the switch directly above it using different-coloured tape.
Once you've tagged your wires, attach them to the corresponding terminals of the new switch. Alternatively, consider transferring one wire at a time if that's easier.
If the current switch has a ground wire that's green, then either attach the wire to the green screw terminal on the new switch or onto the electrical box.
Once you've finished wiring your new switch, push it back into the electrical box and screw it in place.
The final step is to screw on the switch plate and turn on the power.
Note: Your replacement switch might have electrical screw connectors located in slightly different areas to the switch you're replacing. However, most switches include a pair of terminals on opposite sides of the switch top with a single terminal at the bottom.
How to replace a pull cord light switch
If your pull cord in your bathroom is discoloured or broken, it's time to fix it. Thankfully, they're quick and easy to replace, and you can buy one from most DIY shops.
To replace the pull cord, follow these steps:
Turn off the electrics in your house
Stand on a step ladder you've firmly secured
Find the clip at the top of the string, which will be near to the switch on the ceiling where it enters.
Unclip the worn pull cord and discard.
Clip your new cord into the fitting.
Turn back on your electrics.
Test that the new pull cord works and that the fit is secure.
FAQs
Can I replace a light switch myself?
If you're a confident DIY'er, there's no reason you can't change a light switch yourself following our steps above. However, if you're in any way unsure, we recommend filling in our request a quote form to get quotes from electricians near you.
Do you need an electrician to change a switch?
If you’re wondering whether you should hire an electrician or do the job yourself, we recommend assessing the job at hand and working out whether it requires a complex or simple solution. For a quick, safe, and secure fit, it’s worth spending a little extra to ensure a professional job.
When you hire one of our trusted professionals, you’re able to see their profile and view their customer reviews. Even better, those reviews are from your neighbours and checked by us to make sure they’re legitimate.
How do I replace an old light switch with a new one?
Follow one of our above steps or hire an electrician to take on this project for you.