Blog>How-To Guides>How to build a brick BBQ in 8 steps
Last updated: 25 October 2021

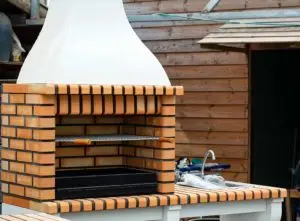
How to build a brick BBQ in 8 steps
Want to build a barbecue? This guide shows you how to build a brick BBQ step-by-step, so you can have your perfect brick built BBQ at home.

For barbecue fans, you can’t beat having your own sturdy brick BBQ in the garden. In this guide, we look at how to build a brick BBQ, the tools you’ll need and the steps to take.
By building your own brick built BBQ you can create the perfect size and shape barbecue for you and your home. Keep reading to find out more.
How to build your brick BBQ in 8 steps
We’ve put together this step-by-step guide to show you how to make a brick BBQ for your home.
The process should take you two days to complete – on the first day you’ll be preparing the brick BBQ area and laying the first set of bricks. Then on the second day you’ll finish laying the bricks and finishing off the mortar work.
Gather these tools needed to make your brick BBQ
Here are the tools you’ll need to build a brick BBQ:
Bricks
Mortar (builder’s sand and cement)
Bucket
Pencil or chalk
Bricklaying trowel
Spirit level
Lump hammer
Bolster chisel
Tape measure
A piece of metal or rubber tube 20-25mm diameter (for scoring the mortar)
Soft hand brush
Protective gloves
Safety goggles
If you don't have the tools, then a professional definitely will, so it might be easier to hire a bricklayer instead.
See the tradespeople we've checked for your job
But if you do have the tools to build the BBQ yourself, then let’s get started…
1. Choose the location for your BBQ
You’ll need to start by deciding where you’re going to build your brick BBQ, which will ideally be a hard, flat surface. Most homeowners choose to build a barbecue on the patio. If, however, you want to build your barbecue on a soft surface (like a lawn) then you’ll need to make a concrete foundation to lay the bricks on.
2. Buy your barbecue grill set
The starting point when building your brick BBQ is to get your grill set – which will contain the grill unit, a charcoal tray and an ashtray. You need your barbecue grill set to determine the size and internal dimensions of your brick BBQ.
3. Calculate the number of materials
Once you know how big your grill set is you can work out how many bricks you’ll need for the BBQ. If you have a grill set of around 700mm x 400mm, you’ll need roughly 100 to 120 standard bricks (215mm x 102.5mm x 65mm) to build a barbecue that’s 10 courses high. Most brick built BBQs are 10 to 12 courses high and will have about 10mm of mortar between each course.
If you opt for non-standard bricks then you’ll need to factor in the dimensions when working out how many bricks you’ll need.
4. Lay out the bricks
Before you start fixing bricks into position, it’s helpful to lay the grill on the ground where you want your barbecue to be and then place the bricks around it to see how the positioning works (remember to leave a 10mm gap between each brick to allow for the mortar).
Once you’re happy with the positioning of the bricks, use a pencil or chalk to draw around the outside of the bricks on the floor to clearly mark where they will be laid. You can now put the bricks and grills to one side.
5. Mix the mortar
You’re going to mix the mortar in two batches – the first on day one for the first 5 courses of bricks, and the second on day two for the remaining five courses of bricks. It’s important to mix the right amount of mortar so that you have enough for the first five courses of bricks, but don’t make too much that you’ll waste it before you have a chance to use it.
You also need to pay close attention to the ratios of sand to cement so that you can repeat the exact same ratios for the second batch so that the mortar is the same consistency and colour across all the courses.
Top tip: A good ratio is 4:1, with four parts builder’s sand to one part cement.
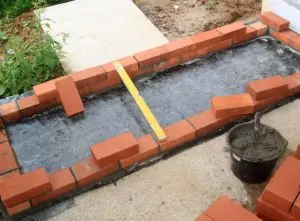
6. Lay the first five courses of bricks
Using the marked guidelines you pencilled or chalked on the ground, start by placing enough mortar within the lines to take the first two bricks – be generous with the mortar. Lay your first brick and knock it down to be level, aiming to have a mortar bed of 10mm across all courses.
Take the second brick, spread mortar onto one end and place it up against the first brick you laid and gently tap it into place. Use a spirit level to check that both bricks are suitably lined up. Then repeat this process for the rest of the first course, and keep going until you complete 5 full courses of bricks.
Once you’ve completed the first five courses, leave them to allow for the mortar to harden – this is important so that the base of the brick BBQ can take the weight of all the bricks on top.
Top tip: The third brick usually turns the corner to start creating the back wall of the brick BBQ, so you can lay the third brick at a 90-degree angle to the second brick – this helps create a stronger structure for your barbecue.
7. Plan the grill shelves
Before you move on to finishing the last 5 courses of bricks, you’ll need to plan the shelves that will support your grill set. Work out a comfortable height for using the grill and you’ll then need to lay three bricks side pointing inwards on each side to create the shelves.
You’ll need to create three shelves, one for the ashtray, one for the coals tray and then another grill rack. If you’re building a brick BBQ with 10 brick courses, you’d typically create the shelves on courses 6, 8 and 10.
8. Finish off the final five brick courses
With your shelves planned you can now finish off the final five courses of bricks, building in the three shelves. Once done, leave for the mortar to harden. Put your grill set in place and you’re ready to go. Job done.
See the tradespeople we've checked for your job
How to build a brick bbq without cement
If you want to make a brick BBQ without cement or mortar, you can create a more simple brick barbecue pit by stacking fireproof bricks or cinder blocks so that they fit together neatly with no mortar needed. The barbecue pit won’t be a robust structure like a bricks and mortar barbecue, but it is a simpler alternative.
Hire a professional to build a barbecue
If building a brick barbecue doesn’t sound like your thing, or you don’t have the time to dedicate to the job, hire a local tradesperson to do it for you.
As with all home improvement projects, we always recommend obtaining at least three quotes from different tradespeople in your area. You'll want to shop around to make sure you're paying a fair and competitive price for the work for your brick barbecue project. And, thankfully, we've got a tool that makes finding multiple quotes super easy.
Our request a quote feature is perfect for getting multiple quotes. You simply post details about the work you need doing and we’ll send it out to local tradespeople in your area. Try it out – it's quick and easy!
Brick barbecue design ideas
Looking for inspiration for how to create a beautiful area for your brick barbecue design? Check out our BBQ area ideas. Or, maybe you fancy building a pizza oven instead of a barbecue, in which case check out our guide on how to build a pizza oven.
More Bricklayer Articles

See the tradespeople we've checked for your job