Blog>How-To Guides>How to make a wine rack in 7 simple steps
Last updated: 5 November 2021

How to make a wine rack in 7 simple steps
Prop up your corks in style with our how to make a wine rack guide. We're going to take you through the best and easiest way to complete this DIY project.

Prop up your corks in style with our how to make a wine rack guide. We're going to take you through the best and easiest way to complete this DIY project.
Before we get started, it's worth noting that you'll need some basic woodworking skills to complete this project. Although the design we're showing you is simple and stylish, accuracy and patience are required to get this right.
If you're in any way unsure about doing the project yourself, why not hire a professional your neighbours know and recommend to build a bespoke wine rack for you?
How to make a wooden wine rack in 7 simple steps
So, how do you make a simple wine rack?
First, you work out how many bottles of wine you want to house. We're going to show you how to make a wooden wine rack that holds 13 bottles. You can adapt this design to make it longer or taller if required - no judgement here!
Tools you’ll need for the job
Here's what you'll need before you get started.
Pencil and ruler
Tape measure
Circular saw
Chosen wood from your local hardware store
Drill and wood drill bit
Wood primer and stain
Sander
How to make a wine rack lattice
Step 1: Measure your centre sections
For the centre sections of your wine rack, mark out 12 inches by 8 inches and cut with a straight edge using a circular saw. Repeat 8 times until you have 8 same-sized rectangle pieces.
Step 2: Measure your end sections
To make the end pieces, mark out 8 inches by 8 inches and cut using a circular saw. Repeat twice so you have 2 same-sized pieces.
Step 3: Mark the slot sections
As we're teaching you how to make a criss-cross wine rack, this part is about marking the areas the wood is going to slot together to make the lattice effect.
So, take a centre plank, find its horizontal centre and mark with a pencil. From that centre line, measure to each end of the plank and find the centre of that half. Mark with a pencil. You should be left with three marks that divide the plank into thirds.
The outer marks are where your slots are going to go. From those lines, measure a straight line 6 inches along the width of the plank and mark with a pencil. From that line, measure ½ a cm on either side towards the midline and mark again. Draw a straight line back up the plank so you now have two thin rectangle slot shapes on the plank that are ½ cm wide.
Repeat this for the other 7 planks.
Top tip: Use tracing paper and cut out a paper template to save yourself some time.
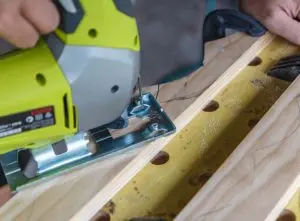
Step 4: Cut out the slot sections
Once this is done, it's time to cut out the slot sections with your circular saw. The best way to do this is to drill a hole at the end of each slot. This lets your circular saw run along the edges so the section pops out in one clean movement.
Once the sections are all cut, sand them down until they're smooth. Use a rasp if necessary.
Step 5: Test fit the sections
Once all your pieces of wood are ready, test fit them by slotting them together at a right angle. The fit should be perfect. If not, you might need to sand down the slots a little more.
To create the finished result, take the end pieces and fit those to the first lattice to create your base. Then, add the other centre sections in a criss-cross until you get to the last piece. Fit the other end piece to create the base on the opposite end.
You should now have 7 diamond shapes and 13 places to store wine bottles.
Step 6: Apply the pre-stain and finish
Now you know the pieces all fit, dismantle the design and use some pre-stain to paint the wood. Let it dry before using your chosen finish.
Step 7: Reassemble the design and enjoy
Once the pieces are dry, reassemble the design. If there are any wobbly bits, use some wood glue to create a sturdier fit. Otherwise, place your wine bottles on your latticework and bask in the glory of a job well done!
See the tradespeople we've checked for your job
FAQs
What can I use instead of a wine rack?
There are various objects that double up as a wine rack, such as towel organisers, shoe holders, shelving units and even storage racks. We recommend making sure you store any wine as horizontal as possible, as this stops air from entering through the cork, keeping the wine at its finest.
What is the best wood to make a wine rack out of?
If you're keeping your wine in a cellar, redwood, cedar and mahogany are industry preferred woods. However, for your DIY project, any reclaimed hardwood from your local hardware store is recommended for both environmental and eco-friendly credentials.
How do you make a wine rack for beginners?
If you aren't confident in your DIY abilities, start small by repurposing old items such as cabinets, storage units and shoe racks. If you're more confident, use this how to make a wine rack guide to fashion a diamond-shaped design.
Should I hire a professional?
If you’re thinking of attempting any DIY work, we ask you to think about the risks associated with bad repairs – not to mention the extra costs involved when it comes to correcting any mistakes. If you’re in any doubt about taking on a task, we highly recommend hiring a local expert your neighbours know and trust.
When you hire one of our trusted professionals, you’re able to see their profile and view their customer reviews. Even better, those reviews are from your neighbours and checked by us to make sure they’re legitimate. Not only that, but if you book one of our members for the job, we guarantee their work, which gives you the extra peace of mind and security that you and your house is in safe hands.
Which Checkatrade member could make me a wine rack?
We recommend a carpenter for the job - they will have the hands-on skill and experience to create a bespoke wooden wine rack.
If you're wondering what a wine rack might cost to create, then check out our carpentry cost guide for some guidance. The best way however to get a good cost idea is to request quotes from at least three carpenters in your local area.
Find carpenters your neighbours recommend for the job by searching your postcode below.
More Cabinet Makers / Handmade Furniture Articles


See the tradespeople we've checked for your job