Blog>How-To Guides>How to use a stud finder
Last updated: 26 November 2021

How to use a stud finder
Learning how to use a stud finder for all your wall-mounting needs is imperative for a safe and sturdy finish. Whether it's mirrors, shelves, TV's or large pieces of artwork, follow our step-by-step guide to avoid accidents and maintain peace of mind.
Learning how to use a stud finder for all your wall-mounting needs is imperative for a safe and sturdy finish. Whether it's mirrors, shelves, TVs or large pieces of artwork, follow our step-by-step guide to avoid accidents and maintain peace of mind.
What is a stud finder?
A stud finder is a tool for finding the supporting structure (aka, stud) behind a wall. It's the strongest, load-bearing part of the wall and therefore the bit you need to find before mounting any heavy accessories or electronics. As it's a part of the wall support, studs are surrounded by empty space, so it takes a little effort to find them. A stud sensor uses electricity or magnets to pinpoint the changes in wall density and locate the nails used to support the studs.
Tools required for the job
Before you start mounting, make sure you equip yourself with the following:
Your chosen stud finder
Spare batteries
Pencil or marker
A spirit level
Flexible measuring tape
Your required mounting material and screws (depending on the type of wall you're drilling into)
An extra person to help if the item is large or heavy!
The object/item you're mounting
See the tradespeople we've checked for your job
How to use a stud finder
Now you're prepped, it's time to get mounting. Use our step-by-step guide to help ensure a smooth and painless process.
Locate your ideal hanging location
This is a step people often skip. However, it's important to consider how your item will hang. Finding the stud wall and your ideal location is one step, but working out whether the mountings are at the top, in the middle or at the bottom of your item will determine where you mark the hanging points.
Top tip: If you're not sure, read the manual! Check the instructions to avoid making any potentially hazardous faux pas.
Another key consideration is visibility. Make sure your item is where you want it to avoid having to move it and repair the holes because you've changed your mind. The last thing you need to do is clear your workspace to create a safe environment before your begin the hanging process.
Prepare to use your stud finder
This step goes hand in hand with preparing your materials. For example, weak batteries in your stud finder are likely to cause false readings. So, be sure to prepare your stud finder by cleaning the electrodes free from dust and debris, which helps guarantee an accurate reading.
Next, consider protecting the wall from scratches by using a thin piece of felt materials to place between the stud finder and the wall. Then, once you're happy, turn on your stud finder and calibrate it using the instructions if necessary.
Turn on the stud finder and locate the stud
Now you're ready to locate the stud, it's time to search for it! Housing regulations dictate that studs shouldn't be more than 16 inches apart, but in older homes, you might get some that are up to 24 inches apart. Just focus your search across a width of about two foot and you should find one. Mark it with your pencil and then move on, working left to right along the wall. If you still struggle to find the stud, move the finder up and down a foot and repeat the process.
Top tip: Remember that the stud is looking for nails, so mark the point if it finds one and draw a line vertically up the wall. Then, measure 16 inches across the walls to find the others and verify their location with the stud finder.
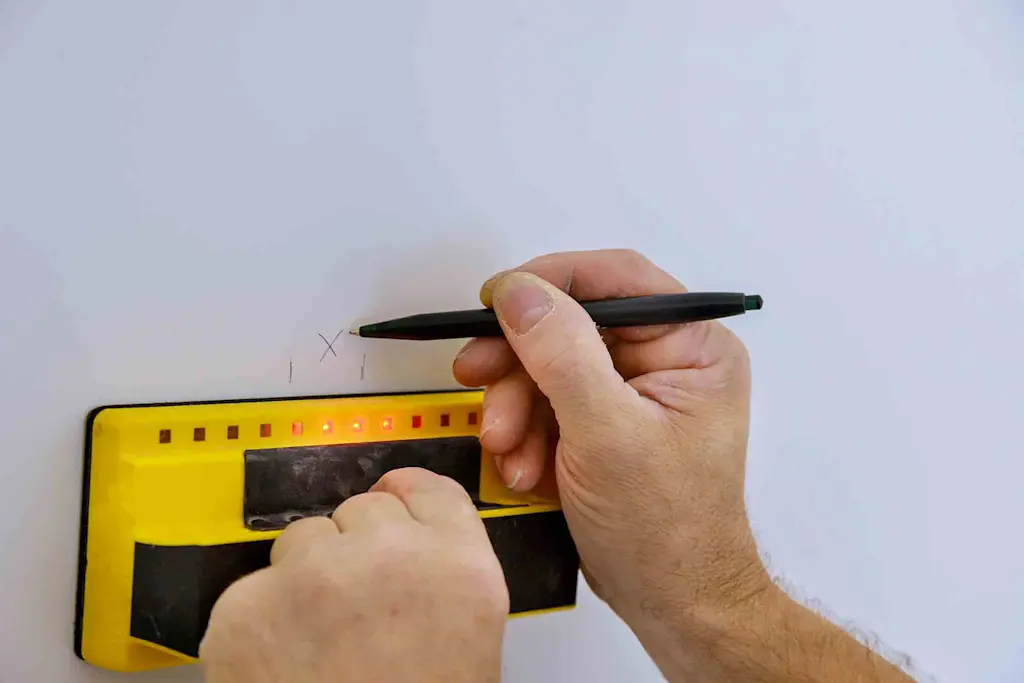
Mark the spot with an X
When your stud finder alerts you to the stud, it might beep, flash or both. When that happens, mark the spot with an X using a pencil so it's easy to erase. Do this several times to confirm the same spot and move your finder up and down to make sure you're definitely on the stud.
Find the centre
It's worth noting that not every nail you find will be dead centre. In some homes, walls can bow a little. In order to find the edges of the stud, slowly move the finder left and right and mark the edges. Typically, studs are made from 2 X4's. It's important to find the centre to ensure a sturdy foundation. It's less important if you're just hanging pictures. However, for items like TVs and shelves, measure and mark twice.
Top tip: Always use the right bolts or screws when hanging your project. A weak mounting attachment can still pull away from the wall if you've used the wrong equipment.
Hang your item!
Once you've located the studs and marked out the area, it's time to hang your project. For art or photos, follow a picture hanging tutorial. For larger items, follow the mounting instructions to ensure a safe and sturdy finish. And if you're still not sure, why not hire one of our professionals to help you?
See the tradespeople we've checked for your job
FAQs
How much do stud finders cost?
Stud finders range from £5 on the lower end to £40 on the higher end. They're often battery-powered, so don't forget to include the cost of batteries in your purchasing decisions.
Should I hire a professional?
For peace of mind and quality assurance, we recommend hiring a professional to help you hang valuable items. Although it's possible to do the job yourself, they're fiddly and easy to get wrong if you're in any way unsure about what you're doing. Check out our handyman prices for an idea of hanging costs.
How to use a magnetic stud finder?
Magnetic stud finders locate metal nails using a 'pull attraction,' so be sure to mark each sense point with an X to gain a clearer picture of where the nails in your stud walls are located. Other than that, the process is much the same as above.
How to locate wall studs?
Use our step-by-step guide above to locate wall studs using any of the equipment available on the market.
How does a stud finder work?
Magnetic stud finders locate metal nails in wooden studs, whereas electronic stud finders detect density changes in a wall.
See the tradespeople we've checked for your job
Summary
Once you've finished using your stud finder, double-check your work. Try to locate multiple horizontal points along the line you're looking to hang your item. It just gives you some wiggle room when it comes to hanging placement.
Before you hang your item(s), make sure you find the studs on a wider piece of wall. They're typically 16-24 inches apart, and verifying the studs that exist to the left and right of your project, you can make sure you haven't accidentally found another piece of metal in the wall.
Some walls will have metal flashing, brackets, or piping on the inside. That's why it's important to verify the studs before you start drilling. It will save you time and money.


See the tradespeople we've checked for your job