EXPERT ADVICE
DIY tiling vs Professional tile installation
Updated 07/26
By: Emma Potter
Reviewed: Content Team
Tiling yourself can save on labour costs, but it demands real skill, patience, and the right preparation to avoid an expensive redo. Here's what's genuinely involved in each route, so you can decide with a clear picture rather than just guessing at the savings.
What to weigh up before committing to DIY
The common mistakes that trip up first-time tilers
Why the substrate matters as much as the tiling itself
What you actually gain by hiring a professional
Roughly what professional tiling costs
How to find and hire a good tiler
Find a tiler near you
DIY tile installation: what to weigh up
Most people can fit or lay some tiles, but far fewer can install tiles that actually look great. Before committing, consider:
Time: if you work full time or have other demands on your schedule, be realistic about fitting this in. It rarely finishes in one go.
Inconvenience: unless the space is small and simple, expect tools and materials around for several days, and think about how that affects the room and household in the meantime.
Cost: you'll likely save on labour if the job goes right first time, but tools and materials can eat into that saving more than people expect.
Risk: it's entirely possible to complete a DIY job with no issues, but it's not guaranteed. Weigh the risk to your time, budget, and the finished look if things don't go to plan.
Skill: hiring a professional means paying for their experience, including the ability to solve problems as they come up, which is often what separates a passable job from a genuinely good one.
If you decide to go ahead, our step-by-step guide to tiling a floor covers the full process and the tools you'll need.

The substrate matters as much as the tiling
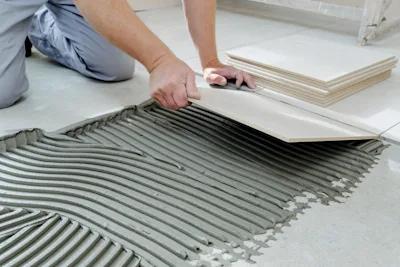
This is a step many DIY guides skip past, but it's often the actual cause of tiles cracking or lifting later on, rather than anything to do with the tiling technique itself. Tiling straight onto an unprepared surface, particularly plywood, chipboard, or an uneven wall, without the right preparation can undermine even a technically neat tiling job.
Depending on your substrate, you may need a flexible adhesive system, or a rigid layer like cement backer board fitted first. Getting this step wrong is one of the more common reasons a DIY tiling job needs redoing within a year or two, so it's worth researching your specific substrate before you buy a single tile.

If your substrate is plywood specifically, our guide on getting tiles to stick to plywood covers exactly what preparation that needs.
Common errors made by DIY tilers
Wrong measurements: there's little margin for error. A tile cut 1mm too small leaves a gap; 1mm too big and it won't fit without extra work.
Poor cutting or injury: cutting tiles takes precision and experience. Beyond the risk of injury without proper protective equipment, a bad cut means wasted tiles and a poorer finish.
Poor fitting: tiles that don't line up are often down to an uneven surface or inconsistent adhesive. Professionals learn the right amount of pressure to "impose" a tile; it's easy for an amateur to break a tile or fit it wonky instead.
Removing spacers awkwardly: spacers make laying tiles easier, but removing them cleanly at the end takes a careful touch.
Get the support of a tiler near you
Find a tiler near you
Tips to reduce common DIY errors
These may add time to your project, but should help you avoid the issues above.
Practice and be patient
If the space is small, use it to practise: measure carefully, get comfortable with your tools, and get a feel for handling and setting tiles before tackling anything more complex.
For a bathroom, multi-fixture room, or awkward-shaped space, expect to cut tiles around every obstacle. Measure precisely, trace fixtures with pen and paper as a cutting guide, and order extra tiles (commonly 20% more, or more if you're inexperienced) to allow for mistakes.
Get the right equipment and materials first
Beyond your chosen tiles, you'll need adhesive, grout, and sealant, plus tools including a grout finishing tool, rubber mallet, masking tape, pencil, tile cutter, spirit level, spacers, sandpaper, and a dustpan and brush. Factor this cost in before assuming DIY will be significantly cheaper.
You'll also want kneepads, steel toe-capped boots, and gloves, since tiling is physically demanding and can strain your knees and back over a long session.
Plan the layout properly
Draw out your intended tile layout on the floor or wall first, including where cuts will fall at edges or around fixtures. Use spacers to keep gaps even, and check levelness regularly with a spirit level, adjusting any tile that's not sitting flat while the adhesive is still workable

On Checkatrade, you'll only find trades who meet our high standards and pass up to 12 checks.
Why opt for professional tile installation
A professional tiler brings accredited experience and the ability to complete the job to a high standard, without the trial and error a first-time DIYer works through.
You gain their experience and knowledge
A professional knows exactly what a job like yours involves, can solve problems as they arise, and can advise on the best finish for your specific space and tiles.
A professional saves time and stress
Any home renovation is disruptive; hiring a tiler lets you focus on everything else. A job that might take a professional around 8 hours could take an inexperienced DIYer 16 or more.
A professional brings their own specialist equipment
Tiling needs a range of specialist tools a tiler already owns and knows how to use safely. DIYers need to source, rent, and learn these, often while cutting tiles for the first time. Professionals also tend to waste fewer tiles through mistakes, since ordering extra for breakage adds to DIY costs.
Decided tiling is best left to the professionals?
That's a sensible call, especially if you're short on tiling experience. Look for a tiler with genuine, verified reviews, vetted by a reliable platform like Checkatrade, and get quotes from at least three tradespeople before deciding.

How much does tiling cost in 2026?
Discover average tiling costs in the UK, including bathroom, kitchen, and floor tiling prices per m², alongside tips to budget wisely.

Before you decide: DIY or professional?
FAQs
After prepping, a professional can typically tile a bathroom in around 6 to 8 hours, plus time for the tiles to set before use.
Order around 20% more than your measured area, to allow for cutting, breakage, and human error. First-timers may want to order more still.
Pricing varies by room size, tile type, and substrate preparation needed. See our floor tiling cost guide for current rates, and get a quote from a local tiler for an accurate figure.
Related guides
Find a tiler near you
See the tradespeople we've checked for your job