Blog>How-To Guides>How to board a loft
Last updated: 2 December 2021

How to board a loft
All too often, lofts are an abandoned and unused space in our homes. This is unfortunate because most lofts are bursting with potential. With this guide, you can learn how to board a loft with step-by-step instructions to allow you to safely unlock this unexplored space.

All too often, lofts are an abandoned and unused space in our homes. This is unfortunate because most lofts are bursting with potential. With this guide, you can learn how to board a loft with step-by-step instructions to allow you to safely unlock this unexplored space.
Imagine having a dedicated area to store Christmas decorations, spare clothing, boxes of surplus household items and much more. A loft can be a secure, clean area, allowing you to maximise space in the rest of your home.
Read on to find out how to board your loft. We will cover everything from the best way to board a loft, to how to board a loft over insulation. If you're looking for a professional to help you out, then use our free search tool.
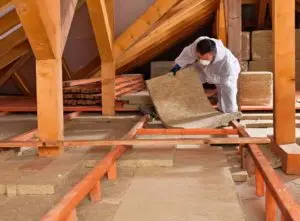
How to board a loft over insulation
Step 1: Preparation and tools needed
First things first, you will need to gather the right tools. The best way to board a loft is to do it safely and carefully, eliminating as much risk as possible. Use the proper tools and equipment, including:
Hammer
Drill
Jigsaw and bench
Screwdrivers
Pencil
Tape measure
Face mask for protection
Gloves for protection
Step 2: Measure and measure again
Firstly, you will need to measure the floor area of your loft. Always measure twice to prevent any mistakes.
It is very common to simply board over the centre of a loft to save time and materials. Plus, the outer edges of your loft may not be high enough to use anyway.
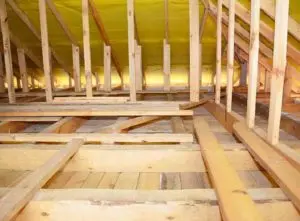
Most boards for lofts will be sized either 2,400mm x 600mm or 1,220mm x 320mm, and both will be 18mm thick. Please note we recommend 22mm thick (as is typically used for a first floor) as this will be able to easily support sensible storage requirements. A thinner board will suffice for very light storage and minimal use but we advise to invest in a more substantial board.
It is essential to ensure your loft boards will fit through your loft opening.
Step 3: Installation
You are now ready to begin. If you are unsure how to board a loft over thick insulation and the insulation protrudes over the ceiling joists, you may need to remove some of the excess layers before laying boards.
Once you have put on your face mask and gloves, use a small board resting on the ceiling joists as a makeshift work platform.
Begin laying your boards down, following a staggered pattern for strength and safety.
You may need to trim the boards around any light fittings and wires.
Finally, screw the boards into the ceiling joists.
To learn more about insulation and prices, please see our loft insulation cost guide.
See the tradespeople we've checked for your job
Important considerations
Before beginning, please consider the following:
Arrange a structural analysis to make sure your loft is strong enough to cope with the weight of storage.
Never position insulation right above downlights.
It is essential you do not cover vents with insulation.
Squashing insulation is not recommended as this will decrease its effect by up to 50%.
Attaching loft boards to ceiling joists can cause future issues.
See the tradespeople we've checked for your job
How to board a loft with loft legs
Loft legs are a perfect way to prevent squashed insulation in your loft. They are lightweight, robust, and installation is simple. Read on to learn how to board a loft with loft legs:
Firstly, ensure that the loft’s ventilation is good and not obstructed.
You may also need to remove the top layer of insulation to clear the ceiling joists.
Screws should be joined to the loft legs before you enter the loft to prevent losing them.
Attach the loft legs with screws onto the joists or trusses, following a grid pattern.
The size of the chipboard sheet will determine the space between the first and second row. Plus, these sheets will be positioned on the top platform of the loft legs.
Ensure you attach loft boards perpendicular to the trusses or joints.
Attach the first board on the back edge.
The front edge will be screwed into place once the second board is positioned.
Finally, using a screw, join the chipboard and the upper platform of the loft leg.
How to board a loft for storage
Is your home feeling cluttered? Not enough storage space? Why not learn how to board a loft for storage? Using one of the two previous methods, prepare your loft then follow the below tips to tap into the potential of this space:
Consider widening the loft opening to make it easier to use.
Install a safe and easy to use ladder. This will make accessing your loft less difficult and save you time.
Add lighting to increase visibility. This way you will be able to quickly spot what you are looking for, plus, it will help when organising your loft.
Look into storage boxes and shelves to cleverly utilise the space available. This will also help with keeping your loft tidy and clean.
See the tradespeople we've checked for your job
FAQs
How much does it cost to board a loft?
Boarding a loft can be dangerous and complicated so it is definitely not a job recommended for DIY beginners. For safety and peace of mind consider hiring a tradesperson to board your loft. Professional loft boarding will usually cost between £1,300 and £3,125.
For more information, please see our loft boarding cost guide.
How long does it take to board a loft floor?
It is difficult to give an accurate timescale for loft boarding as this will depend on a number of factors. For example, the size of the loft, accessibility and method used will impact the time taken. Having said this, loft boarding usually takes between one and two days.
More Loft Floor Boarding Articles


See the tradespeople we've checked for your job