Blog>How-To Guides>How to insulate a loft
Last updated: 12 January 2021

How to insulate a loft
Insulating your loft may not sound like the most exciting job but in reality, about 25% of the heat output in your home will escape if your roof insulation isn’t up to scratch. This can mean higher energy bills and a colder home, not an ideal situation to be in. With fantastic benefits like

Insulating your loft may not sound like the most exciting job but in reality, about 25% of the heat output in your home will escape if your roof insulation isn’t up to scratch. This can mean higher energy bills and a colder home, not an ideal situation to be in.
With fantastic benefits like increased energy efficiency and a lowered carbon footprint, this is a job that is well worth the investment. Furthermore, learning how to insulate a loft yourself can save you money on labour costs and create a fantastic opportunity to expand your DIY knowledge.
In this guide, we cover a whole range of different areas such as how to insulate a loft and board, plus, how to insulation a loft roof. So, if you are looking to upgrade your loft insulation, read on to learn more.
How much money will insulating my loft save me?
While you will need to pay for the materials and tools necessary to insulate your loft, doing the labour yourself can save you a good amount of money. In fact, you will quickly recover your initial investment with the savings you will make on energy bills.
If you are not confident this is a job for you and are considering hiring a professional, please see our loft insulation cost guide. Here we dive deeper into the world of loft insulation, the prices you can expect to pay, plus, the savings you can look forward to.
See the tradespeople we've checked for your job
What types of loft insulation are there?
Unfortunately, insulating your loft is not as simple as going out and buying insulation. There are actually a few different methods of insulating your loft. These include:
Blanket loft insulation
Loose-fill loft insulation
Sheet loft insulation
Blown-fibre insulation
This guide will cover blanket loft insulation as this is the most effective method and is perfect for beginners. If you do want to learn more about the other options available to you, this is covered in more detail in our loft insulation cost guide.
Important considerations before beginning
Not every loft is the same and there may be some obstacles you need to tackle when laying your insulation. Below are some potential issues that you will need to consider before learning how to insulate a loft:
Recessed halogen lights: If the room below your loft has recessed halogen lights this can be a fire hazard if not correctly dealt with. Either use insulation guards or consider upgrading to safer LED lighting.
Pipes and water tanks: Any disasters involving these utilities will require access by tradespeople to your loft. Therefore, it is worth creating a path from your loft hatch to your water tank for safe access.
Flat roof: If your roof is flat you may need to take a different approach to loft insulation. You can either lay your insulation under the tiles of your roof or under the joists.
Damp: Always deal with any damp issues in your home before laying insulation. See our damp proofing cost guide for typical prices.
See the tradespeople we've checked for your job
How to insulate a loft
Preparation
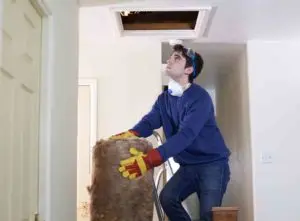
Before you begin, the most important step to insulating your loft is preparation. This ensures your safety and that you’ll deliver a high-quality job that will last for years to come. Always check you have all the tools and materials you will need to prevent unnecessary trips to the DIY store halfway through the process.
You should also consider whether you can safely access your loft and move around without injuring yourself. Don’t forget to buy safety equipment including protective clothing and a dust mask. In addition, ensure you have sufficient lighting to enable you to do a thorough job.
It is worth spending a little time using a vacuum to pick up any dust and debris between your joists. You can also repair any small cracks or damage to your loft joists at this stage. Please note, significant damage or rot will need to be dealt with by a professional.
Finally, always start laying your loft insulation in the corner furthest away from your loft hatch.
Tool and materials needed
As we previously mentioned, gathering the right tools and materials before beginning your loft insulation is essential. You will need the following items when insulating your loft:
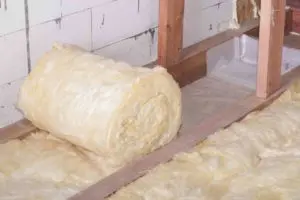
Rolls of loft insulation
Wooden walk boards (to prevent accidental falls and ceiling damage)
Wooden offcuts
Dust mask (to protect your lungs from airborne fibres)
Protective clothing (to protect your clothes)
Long knife with a serrated edge
Panel saw
Scissors
How many loft insulation rolls do you need?
You will need to calculate the amount of insulation you need to cover your loft by measuring the space. To work out the area of your loft to be insulated, multiply length by width and then cut this figure by 10%. This is because you will be laying insulation between joists, not covering the entire loft. If you're not fully confident on working this out, it's best to get a professional in to help. Use our free search tool below to find an insulation specialist near you.
See the tradespeople we've checked for your job
Steps for laying loft insulation between joists
You are now ready to begin laying your loft insulation. The following list will show you step-by-step how to insulate a loft:
Step 1 – Electric cables
You will need to carefully raise any electrical cables and wiring over the insulation to prevent potential fires.
Step 2 – Cut your insulation to size
Spread the insulation out between the joists and using your tools cut to the size of each space. Bear in mind that your initial layer of insulation should be 10cm thick and no gaps should be left between the insulation and the joists.
Step 3 – Pipes and water tanks
You will need to cut your base layer of insulation, so it fits around any obstacles in your loft. These can include extractor ducts, water tanks and pipes. You can also use the insulation to lag pipes throughout your loft. This involves covering pipes with insulation.
Step 4 – Second layer of insulation
Now trim your second layer of insulation to size and lay at right angles to the base layer. This second layer should be roughly 17cm thick, giving a total thickness of 27cm.
Step 5 – Finishing touches
Finally, check there are no gaps between insulation and joists. You can also ensure your insulation is laying flat and in place.
See the tradespeople we've checked for your job
How to insulate a loft and board
Another way to increase the insulation in your loft is by boarding the space. Working in tandem with the usual type of insulation, loft boarding can help to prevent heat escaping as well as transforming your attic into a usable space.
Wondering how to insulate a loft and board? You will need to follow the previous method for insulating your loft first then install your boards as detailed in our how to board a loft guide.
If you feel this job is outside of your abilities, it is wise to hire a professional to do the work for you. For a more in-depth look, review our loft boarding cost guide.
How to insulate a loft roof
Another way of increasing your loft insulation is to apply this to the rafters. This is perfect for attics with deep rafters and you should always use insulation that is 12.5cm thick. In the below
example, we have recommended using rigid boards for insulation as this is an effective solution, but there are other options like using reflective foil.
If you are wondering how to insulate loft rafters, follow the below steps:
Make sure you leave a gap between the insulation and your roof of approximately 5cm.
Assess your rafters for holes, damp and damaged membranes. Mend or replace these before continuing.
Lay out boards on your attic joists for easy access.
Don’t forget to use protective equipment.
Measure the space you are planning to insulate, as well as the distance between the rafters.
Use wooden battens to make sure you leave a space of 5cm between the rafters and insulation. Screw or nail these battens into place.
Cut your rigid boards to size, being very careful to ensure no mistakes are made.
Nail the boards to your rafters, ensuring a precise fit. You may prefer to use a nail gun to save time and energy.
How to insulate a loft hatch door
In order to effectively insulate your attic, it is important you don’t forget to also cover the loft hatch door. You may have one of two different loft hatches, either a hinged loft hatch that opens downwards or a hatch that sits flat on the frame of your loft door. We will briefly cover both options.
So, to learn how to insulate a loft hatch door, keep reading:
Option 1: Hinged
Run a foam strip or compression seal around the outside of your loft hatch. Then run another strip around the outside of the loft hatch frame. This will prevent heat and air escaping into the home.
Option 2: Non-hinged
Run a foam strip or compression seal around the lower, outside line of your loft hatch. Once in place, this will form a tight seal and prevent draughts and warmth escaping.
Insulation:
You can now use insulation to further improve your home’s energy efficiency. Take a plastic bag and use it to cover the inside face of your loft hatch. Fill the bag with insulation and seal with tape.
See the tradespeople we've checked for your job
How to insulate a loft conversion
So, you’ve spent a significant amount of time and money converting your loft into a beautiful, liveable space. Now is the perfect time to use insulation to create a warm, comfortable and energy-efficient space that will last for years to come.
It can be a costly process but learning how to insulate a loft conversion will mean excellent savings on energy bills in the future. Before you begin, it’s worth noting that there are three areas that can be insulated: the walls, the residual space and the roof. Investing in insulation in each of these areas will maximise your home’s efficiency for years to come.
Area 1: Sloped roof
One method is adding insulation between your roof and a stud wall. This can be laid in the way described in our ‘how to insulate a loft’ section. Measure, cut and install.
It may reduce the headroom in your loft, so some homeowners choose to apply insulation outside of the loft. You would need to remove the ceiling of your loft, or your roof tiles, then apply the insulation, which is not ideal due to the cost and time involved.
Area 2: Residual space
The residual space is an area used for storage and is not generally a part of your loft. You can simply lay insulation in between the loft joists.
Area 3: Walls
Usually loft conversions use stud walls as these are effective and work well in attics. It is possible to install insulation between the attic joists and the stud walls or rigid boards.
See the tradespeople we've checked for your job
FAQs
What are the loft insulation legal requirements?
It is worth noting that in order for it to work well, your loft insulation needs to be at least 27cm deep to meet the EEC programme requirements.
How does loft boarding assist with loft insulation?
While the standard method of insulating a loft will help your home to reach new levels of energy efficiency, loft boarding also has a part to play. Using both loft boarding and insulation will help reduce draughts and retain heat, cutting down your energy bills and keeping your home toasty and warm.
For more information on loft boarding, please see our how to board a loft guide.
What is the best insulation for lofts?
Increasing the value of your home and saving you money, loft insulation is worth the investment. But what is the best type of insulation for lofts? Below is a brief summary of each type:
Loose-fill insulation: Messy and unlikely to stay in place but can work well in terms of insulation on a budget.
Blanket insulation: Very common, easy to install and affordable.
Blown-fibre insulation: Quite costly but great for filling spaces that are difficult to access.
Sheet insulation: Perfect for efficiently insulating roofs but very costly.
Can you have too much insulation in your loft?
While insulation is a great way of retaining heat and preventing draughts, is it possible have too much? In short, no. Plus, with proper ventilation damp should not be an issue.
More Roof Rafter Insulation Articles


See the tradespeople we've checked for your job